Optitools Studio
Article 27
Nearly all drives are now equipped with a serial communication port, which is designed to allow the drive to be controlled from a PLC or remote supervision system. The drive can also be set up and monitored using this link. With this connection available it makes sense to provide a simple software package to allow communication from the drive and a PC. Most manufacturers offer this option, and Invertek is no exception. Optitools Studio is a suite of programmes for a PC that provides much more than simple monitoring and programming.
Many serial communications systems use a hardware protocol known as RS485 (see article “Serial Communications”). This is designed for industrial use, but is generally not available on a laptop. So to connect to a drive a USB to RS485 is usually required. These can sometimes prove tricky to set up, so it’s best to use the one recommended by the drive manufacturer. Invertek offer a simpler alternative. The Optistick option plugs into the drive RJ45 connection and provides a Bluetooth link to a PC. Once the Optistick is paired with the PC connection is straightforward.
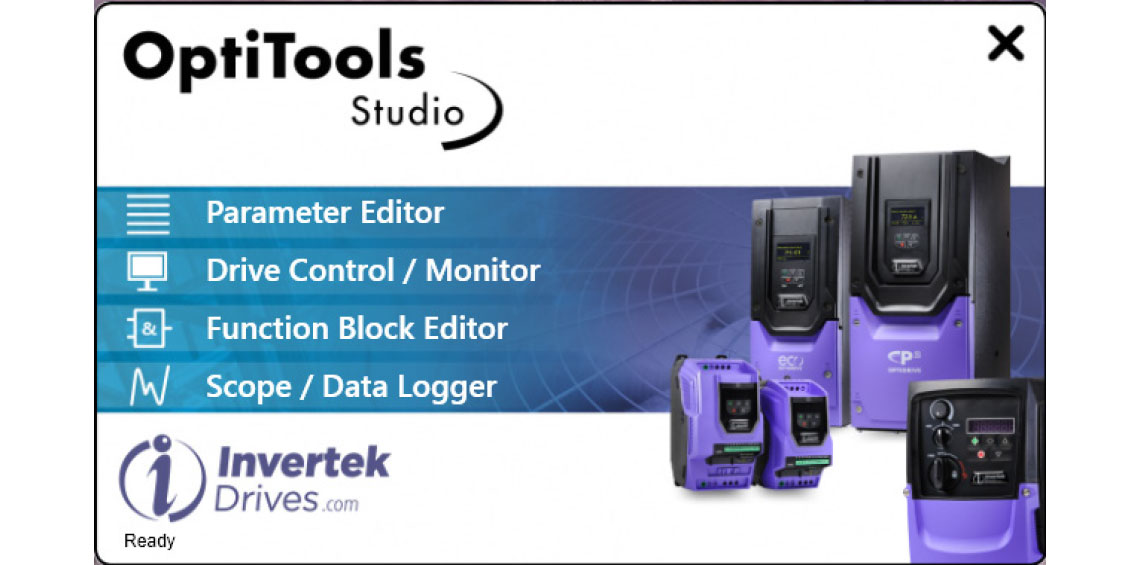
Optitools Studio can be freely downloaded onto a PC (click here to download) and runs with all recent Windows operating systems. It is set up to automatically update to the latest version when opened, although this can be disabled. The opening screen offers four options, as shown in Figure 1.
We’ll look at each of these functions briefly, although the best way to understand them, as with all software, is to try it for yourself.
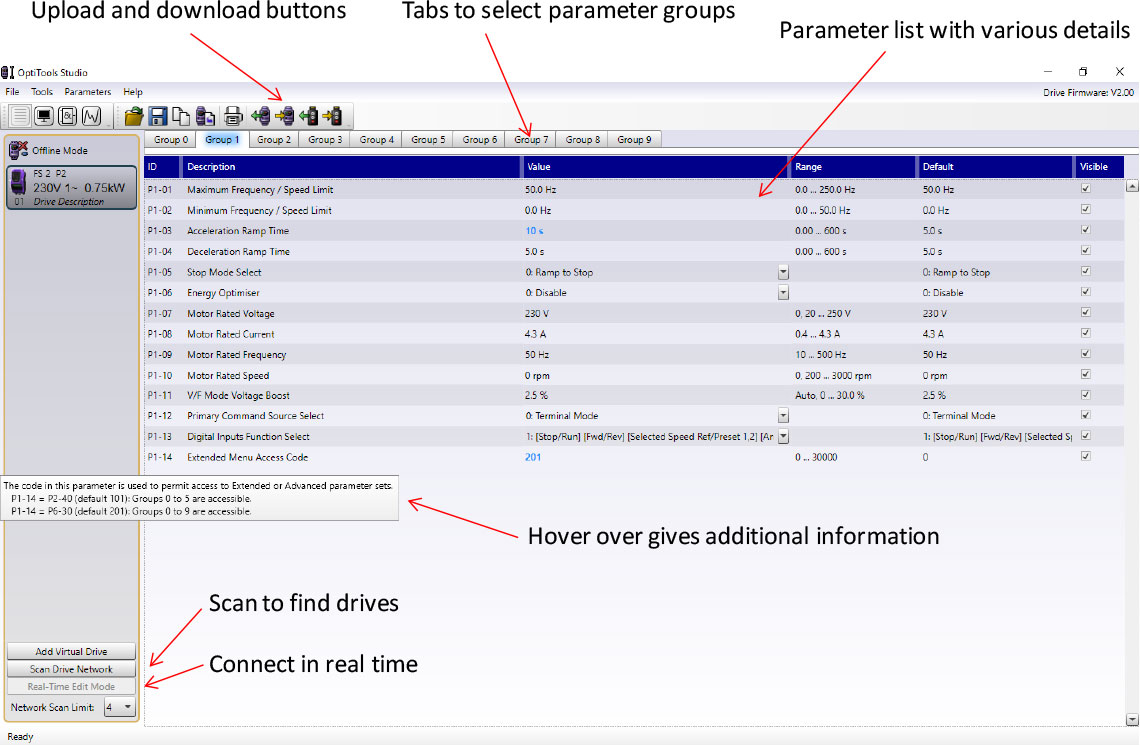
The parameter editor is the most useful function. This allows the user to edit, save, upload and download parameter sets for all types of Invertek drives. Without a drive connected you can open parameter sets, change settings and store the result. As Optitools Studio is automatically updated, you’ll be able to check out the latest parameter additions and changes. It also includes descriptions of each parameter and the various settings, so it can be used as an online manual as well.
To actually connect to a drive, or a network of drives, make sure your cable is connected, or your Bluetooth and Optistick set up, and scan the network. You should find the drives that are on the network – very often this is just one drive of course. If you don’t, you’ll need to check the connections and set up.
Once connected the programme will automatically download the parameters from the drive. You can now check and change these as needed. If you want to upload them to the drive, simply hit the upload button and the parameter set will be uploaded. You can even choose to upload to the Optistick instead. Optitools is particularly useful for checking, changing and monitoring parameters when commissioning. You can also check read only parameters quickly and easily. If you enable real time communication, you can change and monitor parameters in the drive in real time – assuming these changes are permitted. It makes sense to use Optitools studio to record a copy of your parameters in your PC for each drive in your plant or machine. The parameter editor will also allow simple upgrade of a drive’s firmware if that is useful or necessary.
Figure 2 shows a typical display of parameters, with some – but by no means all – of the features highlighted.
The Drive Monitor is the next function available with Optitools Studio. The tool is useful to monitor one or more drives in a system. You can select which features you want to monitor and you can start and stop the drive from the PC. Figure 3 shows the Drive Monitor in action.
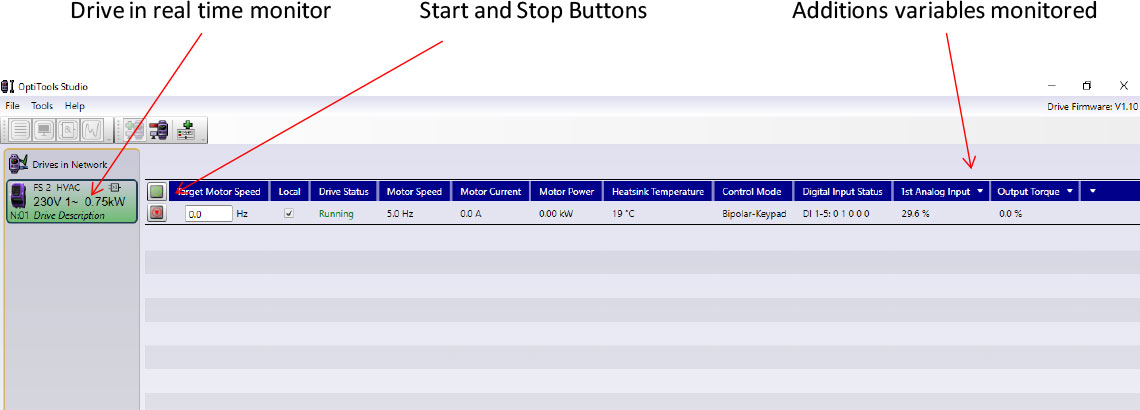
In this example, we have a single drive running in real time monitor mode, and we have selected local control so we can switch the drive on and off with the buttons. The P2 drive is running, but no load is connected, so there’s no current. Monitoring several drives on a network will show up overloads and other anomalies in the system.
The most complex feature of Optitools Studio is the Function Block Editor. Both P2 and Eco drives have the necessary firmware built in to carry out quite complex calculations, logical operations and various internal functions. These functions can be set up and edited only by using the Function Block Editor. Using a simple ‘drag and drop’ approach, the editor allows up to 100 function blocks to be connected up, simulated and then uploaded to the drive. This allows the drive to carry out functions that would require the addition of a PLC or similar controller to the system, so costs and complexity are reduced. Programmes can be stored and uploaded to any number of drives, and various security systems prevent tampering. The Function Block Editor has too many functions to describe here, but these include:
- Input and Output selections and connections
- Basic Logic functions (AND, OR, EXOR etc.)
- Arithmetic functions (Multiply, divide, Square root,Average etc.)
- Comparators, Limiters, Interpolators.
- Timers and Counters (Delay on, Delay off Monostables etc)
- Data handling (Binary to Hex, Shift registers etc.)
- Various Drive functions, allowing the display to be customised, the drive to be a Modbus master etc.
- Creation of new parameters, reading and writing to parameters.
Clearly all these functions create many opportunities to reduce external hardware in many applications. Although complex, it is easy to use and get to know, with manuals available from the Invertek website. To create and support the Function Block Editor is clearly expensive, so while you can download the software without cost and try it out, to store or upload it you’ll need a to buy a licence. You can get an evaluation licence for a short time for free.
A typical working screen is shown in Figure 4.
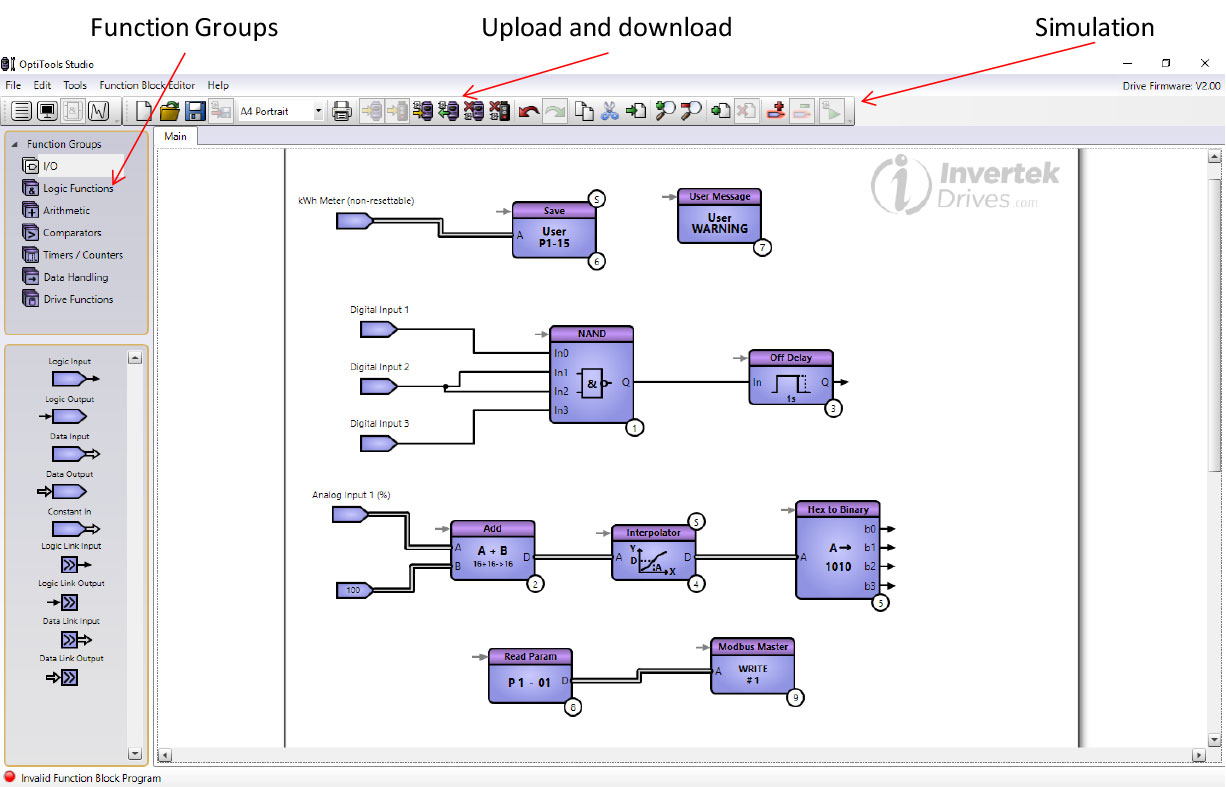
The function blocks are dragged onto the screen and interconnected as needed. Once everything’s correctly connected, the system can be simulated and tested before uploading.
The final function available in Optitools Studio is the ‘Scope and Data logging Tool. When connected to drive as before, up to four channels showing the drive function can be monitored. The drive can capture this information rapidly, and then download it, triggering on a trip for example. Alternatively, it can display what is happening (slowly) in continuous run mode, as shown in Figure 5.
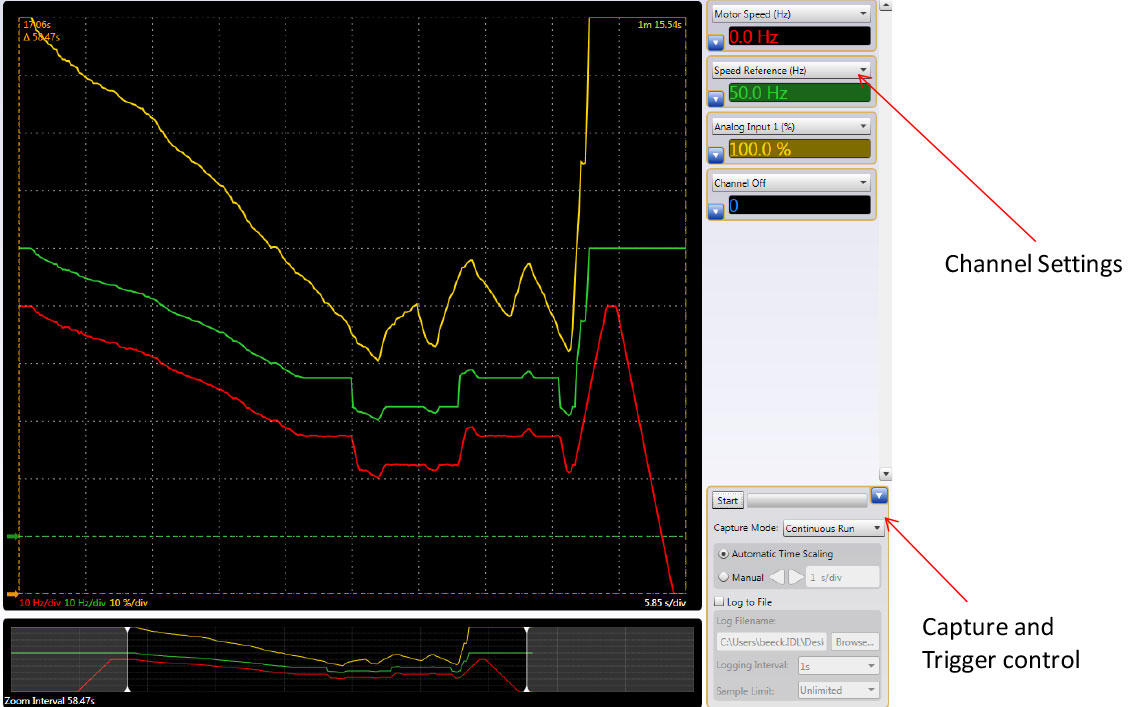
Here the scope function is showing how the motor speed (red) and internal speed reference (green) follows the analogue input (yellow) except around the skip frequency setting.
In summary, as more of us use PCs to look after our business, and as more drives are controlled via serial interfaces, it makes sense to make use of tools like Optitools Studio.